IPv6 Subnets

Just a quick ipv6 subnet cheatsheet.

XXXX:XXXX:XXXX:XXXX:XXXX:XXXX:XXXX:XXXX
      ||| |||| |||| |||| |||| |||| ||||
      ||| |||| |||| |||| |||| |||| |||128--1
      ||| |||| |||| |||| |||| |||| ||124---16
      ||| |||| |||| |||| |||| |||| |120----256
      ||| |||| |||| |||| |||| |||| 116-----4,096
      ||| |||| |||| |||| |||| |||112-------65,536
      ||| |||| |||| |||| |||| ||108--------1,048,576
      ||| |||| |||| |||| |||| |104---------16,777,216
      ||| |||| |||| |||| |||| 100----------268,435,456
      ||| |||| |||| |||| |||96-------------4,294,967,296
      ||| |||| |||| |||| ||92--------------68,719,476,736
      ||| |||| |||| |||| |88---------------1,099,511,627,776
      ||| |||| |||| |||| 84----------------17,592,186,044,416
      ||| |||| |||| |||80------------------281,474,976,710,656
      ||| |||| |||| ||76-------------------4,503,599,627,370,496
      ||| |||| |||| |72--------------------72,057,594,037,927,936
      ||| |||| |||| 68---------------------1,152,921,504,606,846,976
      ||| |||| |||64-----------------------18,446,744,073,709,551,616
      ||| |||| ||60------------------------295,147,905,179,352,825,856
      ||| |||| |56-------------------------4,722,366,482,869,645,213,696
      ||| |||| 52--------------------------75,557,863,725,914,323,419,136
      ||| |||48----------------------------1,208,925,819,614,629,174,706,176
      ||| ||44-----------------------------19,342,813,113,834,066,795,298,816
      ||| |40------------------------------309,485,009,821,345,068,724,781,056
      ||| 36-------------------------------4,951,760,157,141,521,099,596,496,896
      ||32---------------------------------79,228,162,514,264,337,593,543,950,336
      |28----------------------------------1,267,650,600,228,229,401,496,703,205,376
      24-----------------------------------20,282,409,603,651,670,423,947,251,286,016

Xymon Microsoft SQL data query

Using FreeTDS it is possible to connect from A Linux server to Microsoft SQL Server (in this case I use SQL Server 2005), I use this to run a query on a Microsoft SQL Server from Xymon.

First we need to install the required packages, in this case I use a Debian system:

sudo apt-get install libdbd-odbc-perl libdbi-perl tdsodbc freetds-common

Now configure a datasouce in the /etc/odbci.ini:

[DB01-DATASOURCE]
Driver          = /usr/lib/odbc/libtdsodbc.so
Description     = DB Server
Trace           = No
Server          = 192.168.0.1
Database        = testdb
;Port            = 4444
TDS_Version     = 8.0

And add the server (DB01) to the freetds config /etc/freetds/freetds.conf:

[DB01]
        host = 192.168.0.1
        port = 1433
        tds version = 8.0

Xymon setup:

Now create a xymon /ext/xymon-DB01query.pl script to grab the data from the SQL Server.

Below is a basic version only usable on a single host in xymon and without any red/green/orange checking it wil create a test name ‘DB01query’ inside xymon.

Also I presume getting 2 valuables back from the SQL server that are put in @DATA.

#!/usr/bin/perl -w
#############################################################################
# $Id: $
#############################################################################
use strict;
 
## BB and related test constants
#############################################################################
 
use constant GREEN => 'green';
use constant YELLOW => 'yellow';
use constant RED => 'red';
 
# BB Global variables
#############################################################################
 
my $bbtest = 'DB01query';
my $color = GREEN;
my $status = $bbtest . " OK";
 
## Main Program
#############################################################################
{
my $dbuser = 'CHANGETHIS';
my $dbpass = 'CHANGETHIS';
my $dbds = 'DB01-DATASOURCE';
my $machine = 'DB01';
my $perf = "";
my @DATA = "";
 
use DBI;
 
my $dbh = DBI->connect("dbi:ODBC:$dbds", $dbuser, $dbpass,
{PrintError => 1, RaiseError => 1, LongTruncOk=>1});
 
die "Unable for connect to server $DBI::errstr"
    unless $dbh;
 
my $sql = "select * from database01";
 
my $sth = $dbh->prepare($sql)
 or die "Can't prepare statement: $DBI::errstr";
 
$sth->execute();
 
while ( my @row = $sth->fetchrow_array ) {
 $perf = "@row\n";
}
 
@DATA = split(/ /,$perf);
 
$dbh->disconnect;
 
## Send to Hobbit
#############################################################################
my $report_date = `/bin/date`;
chomp($report_date);
 
system("$ENV{BB} $ENV{BBDISP} 'status $machine.$bbtest $color $report_date \n\n
 
RESULT1 : $DATA[0]
RESULT2: $DATA[1]
'\n");
 
}

I also want graphs from this so add a new section to the hobbitgraph.cfg:

[DB01query]
                TITLE DB01query
                YAXIS #
                DEF:RESULT1=DB01query.rrd:RESULT1:AVERAGE
                DEF:RESULT2=DB01query.rrd:RESULT1:AVERAGE
                LINE1:RESULT1#0000CC:RESULT1
                LINE1:RESULT2#FFFF00:RESULT2
                COMMENT:\n
                GPRINT:RESULT1:LAST:RESULT1\: %5.0lf (cur)
                GPRINT:RESULT1:MAX: \: %5.0lf (max)
                GPRINT:RESULT1:MIN: \: %5.0lf (min)
                GPRINT:RESULT1:AVERAGE: \: %5.0lf (avg)\n
                GPRINT:RESULT2:LAST:RESULT2\: %5.0lf (cur)
                GPRINT:RESULT2:MAX: \: %5.0lf (max)
                GPRINT:RESULT2:MIN: \: %5.0lf (min)
                GPRINT:RESULT2:AVERAGE: \: %5.0lf (avg)\n

Edit the hobbitserver.cfg to include the DB01query in the TEST2RRD as ‘DB01query=ncv’ and change the default mode to GAUGE:

TEST2RRD="cpu=la,disk,inode,qtree,memory,$PINGCOLUMN=tcp,http=tcp,dns=tcp,dig=tcp,time=ntpstat,vmstat,iostat,netstat,temperature,apache,bind,sendmail,mailq,nmailq=mailq,socks,bea,iishealth,citrix,bbgen,bbtest,bbproxy,hobbitd,files,procs=processes,ports,clock,lines,ops,stats,cifs,JVM,JMS,HitCache,Session,JDBCConn,ExecQueue,JTA,TblSpace,RollBack,MemReq,InvObj,snapmirr,snaplist,snapshot,if_load=devmon,temp=devmon,DB01query=ncv"
 
NCV_DB01query="RESULT1:GAUGE,RESULT1:GAUGE"

Now add this new test to the hobbitlaunch.cfg in xymon:

>
[DB01query]
        ENVFILE /vol/01/xymon/server/etc/hobbitserver.cfg
        NEEDS hobbitd
        CMD $BBHOME/ext/xymon-DB01query.pl
        LOGFILE $BBSERVERLOGS/DB01query.log
        INTERVAL 5m

Just wait a while and the test should show up in xymon.

Xymon Airco Temperature graph

In this case I will be using Xymon and a HWg-STE device to graph the temperature of 2 Airco units in a server room. To get this in Xymon you will need to create a custom Xymon test.

Note that in this case I am monitoring the airco output temperature (sensors in front of the airco), the overall room temperature is not measured here.

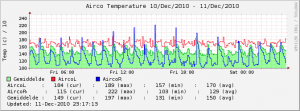
The output on the Xymon page will be something like this:

Airco_L : 167
Airco_R : 116
 
AverageT: 141.5

And the resulting graph something like this:

The HWg-STE is a SNMP enabled device so I will be using the perl NET:SNMP module to get the data from the device and import it in Xymon, which also means this should work with any snmp enabled device as long as you know the right SNMP OID’s.

First we start with the xymon ext script this is placed on the Xymon server in the ‘ext’ directory.
In this script you should change the values for the min/max temperature and ofcourse the device settings like the ip, community and oid value’s

xymon-temp01-sensors.pl:

#!/usr/bin/perl -w
#############################################################################
# $Id: $
#############################################################################
use strict;
 
## BB and related test constants
#############################################################################
 
use constant GREEN => 'green';
use constant YELLOW => 'yellow';
use constant RED => 'red';
 
# BB Global variables
#############################################################################
 
my $bbtest = 'temp01';
my $machine = 'TEMP01';
my $color = GREEN;
my $status = $bbtest . " OK";
 
## Main Program
#############################################################################
{
use Net::SNMP;
 
my $snmphost = '<IPOFTHEDEVICE>';
my $snmpcomm = '<SNMPCOMMUNITY>';
my $temphigha = 210;		# Average Temp High
my $tempwarna = 200;		# Average Temp Warning
 
my $temphigh1 = 200;		# Airco1 Temp High
my $templow1 = 100;		# Airco1 Temp Low
my $temphigh2 = 200;		# Airco2 Temp High
my $templow2 = 100;		# Airco2 Temp Low
my $session = '';
my $error = '';
 
# requires a hostname and a community string as its arguments
($session,$error) = Net::SNMP->session(Hostname => $snmphost,
                                       Community => $snmpcomm);
 
die "session error: $error" unless ($session);
 
my $result1 = $session->get_request(".1.3.6.1.4.1.21796.4.1.3.1.5.1");
die "request error: ".$session->error unless (defined $result1);
 
my $result2 = $session->get_request(".1.3.6.1.4.1.21796.4.1.3.1.5.2");
die "request error: ".$session->error unless (defined $result2);
 
$session->close;
 
my $temp1 = "".$result1->{".1.3.6.1.4.1.21796.4.1.3.1.5.1"}."";
my $temp2 = "".$result2->{".1.3.6.1.4.1.21796.4.1.3.1.5.2"}."";
 
my $tempa = (($temp1 + $temp2) / 2);
 
if ($temp1 > $temphigh1){ $color = "RED"; }
 elsif ($temp1 < $templow1) { $color = "YELOW"; } 
 
if ($temp2 > $temphigh2){ $color = "RED"; }
 elsif ($temp2 < $templow2) { $color = "YELOW"; } 
 
if ($tempa > $temphigha){ $color = "RED"; }
 elsif ($tempa > $tempwarna) { $color = "YELLOW"; }
 
 
## Send to Hobbit
#############################################################################
my $report_date = `/bin/date`;
chomp($report_date);
 
system("$ENV{BB} $ENV{BBDISP} 'status $machine.$bbtest $color $report_date \n\n
Airco_L : $temp1
Airco_R : $temp2
 
AverageT: $tempa
'\n");
 
}

Now we need to let the xymon server know to use this script so edit the hobbitlaunch.cfg file and add the following to the end of the file:

[temk01]
        ENVFILE /vol/01/xymon/server/etc/hobbitserver.cfg
        NEEDS hobbitd
        CMD $BBHOME/ext/xymon-temk01-sensors.pl
        LOGFILE $BBSERVERLOGS/temk01.log
        INTERVAL 5m

Ofcourse we want to graph the data so edit the hobbitgraph.cfg file and add the following to the end of the file:

[temk01]
                TITLE Airco Temperature
                YAXIS Temp (c) / 10
                DEF:AircoL=temk01.rrd:AircoL:AVERAGE
                DEF:AircoR=temk01.rrd:AircoR:AVERAGE
                DEF:AverageT=temk01.rrd:AverageT:AVERAGE
                AREA:AverageT#00FF0066:AverageT
                LINE1:AverageT#00BD27FF:
                LINE1:AircoL#F51D30:AircoL
                LINE1:AircoR#0000FF:AircoR
                COMMENT:\n
                GPRINT:AircoL:LAST:AircoL \: %5.0lf (cur)
                GPRINT:AircoL:MAX: \: %5.0lf (max)
                GPRINT:AircoL:MIN: \: %5.0lf (min)
                GPRINT:AircoL:AVERAGE: \: %5.0lf (avg)\n
                GPRINT:AircoR:LAST:AircoR \: %5.0lf (cur)
                GPRINT:AircoR:MAX: \: %5.0lf (max)
                GPRINT:AircoR:MIN: \: %5.0lf (min)
                GPRINT:AircoR:AVERAGE: \: %5.0lf (avg)\n
                GPRINT:AverageT:LAST:AverageT \: %5.0lf (cur)
                GPRINT:AverageT:MAX: \: %5.0lf (max)
                GPRINT:AverageT:MIN: \: %5.0lf (min)
                GPRINT:AverageT:AVERAGE: \: %5.0lf (avg)\n

To add the data into a RRD file we need to change the TEST2RRD line to include our new temp01 test, so edit the hobbitserver.cfg file and add temp01=ncv to the end of the TEST2RRD config line so it will look something like this:

TEST2RRD="cpu=la,disk,inode,qtree,memory,$PINGCOLUMN=tcp,http=tcp,dns=tcp,dig=tcp,time=ntpstat,vmstat,iostat,netstat,temperature,apache,bind,sendmail,mailq,nmailq=mailq,socks,bea,iishealth,citrix,bbgen,bbtest,bbproxy,hobbitd,files,procs=processes,ports,clock,lines,ops,stats,cifs,JVM,JMS,HitCache,Session,JDBCConn,ExecQueue,JTA,TblSpace,RollBack,MemReq,InvObj,snapmirr,snaplist,snapshot,if_load=devmon,temp=devmon,temp01=ncv"

This means the data is processed by the NCV module, default the NCV module uses DERIVE but in this case we need GAUGE (look at the RRDTOOL website for the differences) so now just add the following line below the TEST2RRD config in the hobbitserver.cfg file:

NCV_temk01="AircoLinks:GAUGE,AircoRechts:GAUGE,Gemiddelde:GAUGE"

Edit the bb-hosts file to include the ‘temp01’ test (note that TEMP01 is also the hostname of the device)

xxx.xxx.xxx.xxx      TEMP01          # testip temp01

And your finished, just wait a while and the test should show up in Xymon as the ‘temp01’ column.

A few notes:

  • The column ‘temp01’ is only usable on 1 device in the bb-hosts, the xymon-temp01-sensors.pl script could be changed to work with the value’s from the bb-hosts file.
  • The perl script could be written a bit beter 🙂

References: